URL: http://www.phpwcms-docu.de/index.php?id=330,275,1,1,1,0

English > Installation & Upgrade > Update to > 1.2.x
Update to Version 1.2.x
Before you start with the update make a backup of all your files and of your database.
How to backup a database?
1. Preparations
After you have made a backup of all your files as well as downloaded and unpacked the actual developer version (DEV), please edit first the file conf.inc.php. This file conf.inc.php is from now on in the following folder: config/phpwcms/.
Please edit the file conf.inc.php, so that the settings comply with the settings of the old version.
Furthermore you have to adapt the following files:
1. /config/phpwcms/conf.template_default.inc.php
2. /phpwcms_template/inc_css/frontend.css
These are the files that will be changed very often. If you have made further changes in other files, please adapt these files too.
2. File Upload
Now you have to upload the adapted developer version with an ftp program and overwrite the existing version.
3. Placing of file and folder rights
Place the file and folder rights with the ftp program to assure the correct execution of all phpWCMS functions.
| Folder |
|
phpwcms_ftp |
|
777 |
| Folder |
|
phpwcms_filestorage |
|
777 |
| Folder |
|
content |
|
777 |
| Folder |
|
content/images |
|
777 |
| Folder |
|
content/gt |
|
777 |
| Folder |
|
content/form |
|
777 |
| Folder |
|
content/rss |
|
777 |
| Folder |
|
content/tmp |
|
777 |
| Folder |
|
content/pages |
|
777 |
| |
|
|
|
|
| File |
|
setup/setup.conf.inc.php |
|
666 |
| File |
|
phpwcms_template/inc_css/frontend.css |
|
666 |
| File |
|
config/phpwcms/conf.indexpage.inc.php |
|
666 |
| File |
|
phpwcms_template/inc_default/startup.php |
|
666 |
4. Update of the Database
|
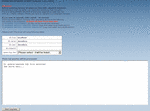
Now you get to the intrinsic update process. For this you have to call the upgrade.php. This file is in the setup folder of your phpWCMS installation. (http://www.your_domain.com/setup/upgrade.php oder http://www.your_domain.com/subfolder/setup/upgrade.php)
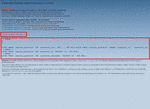
When having called the file upgrade.php, you will see the following overview (see left picture): In the left area above you will see the following fields:
db host: Your database host (mostly localhost)
db name: Your database name
db user: The database user
db prepend:
select sql file: Here you choose the SQL file that will actualize phpWCMS.
|
5. Execute SQL-Update
|
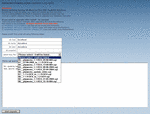
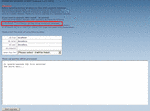
Please klick the drop down field "select sql file".
You will see the following choices:
00__phpwcms_update_older.sql
01__phpwcms_1.1-RC4_22-04-2004.sql
02__phpwcms_1.1-RC4_31-05-2004.sql
03__phpwcms_1.1-RC4_08-06-2004.sql
04__phpwcms_1.1-RC4_13-08-004.sql
05__phpwcms_1.1-RC4_25-08-004.sql
06__phpwcms_1.1-RC4_15-10-004.sql
07__1.1.5-DEV_to_1.1.9-DEV.sql
07__27-08-2004_to_1.1.9-DEV.sql
08__1.1.9-DEV_to_1.2-DEV.sql
Please choose from this list the first date after the release that you have installed. In this case it would be "phpwcms_1.1-RC4_13-08-2004.sql"
When you have installed a version that is older than the date specification in the SQL files, please begin with the file "phpwcms_update_older.sql".
|
|
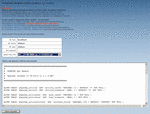
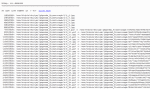
Now you will see in the textarea what entries will be made in the database. Press the "Upgrade" button to accept the alterations.
|
|
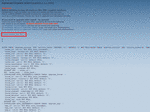
After executing the database actualisation, you can see here an overview of all the taken changes.
To execute further actualisations simply click Choose another SQL file. Then you arrive back at the start point of the upgrade function. From there you can import further updates as already described before.
|
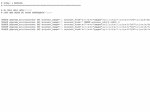
In case of getting this errer message, either you have an actual version that does not need an update or you have chosen a wrong SQL file.
Please click again "Choose another SQL file" to select the next update - if possible. |
6. Execute Additional Updates
| Because in the folder phpwcms_filestorage the subfolders 1-10 are getting unnecessary with the version 1.2.x, you have to move all files inside these subfolders. This is done with the link UPGRADE FILESTORAGE. |
|
A new window will be opened and you will see the following content. When you are not sure whether all files have been moved, click "click here". Then you can close this window and delete the subfolders 1-xx in the folder phpwcms_filestorage.
|
For the following steps please open your phpMyAdmin, because you have to make some changes in the database manually. When you do not know what you have to do, please follow the link and read the section "Restoring via Copy and Paste".
7. Execute Additional SQL Updates
|
To complete the update, you have to execute the last two sql updates via phpMyAdmin to take over into the database. Click the following links in your upgrade browser window: UPGRADE ARTICLE CONTENT IMAGE and UPGRADE ARTICLE CONTENT IMAGELIST.
|
Two new browser windows are now open. Mark the complete content of every window and insert every content one after another into the textarea of phpMyAdmin as described in the description "Restoring the Database". After inserting and executing both windows contents in your phpMyAdmin you can close both windows. The update should have been completed and now you can work with phpWCMS as usual.
|
| Article created: 2005/04/02 |
Last Changes: 2005/07/18 |
| |
|